Sunday, November 13, 2022

"Thinking of You"

The Simon Says Stamp Wednesday Challenge posted on November 9 set the theme "thinking of you." For this challenge, the designers were featuring Paper Rose products. I found that I had an embossing folder from Paper Rose, and put that to work as the background for my card. I invested time (there's just no other word for it) with the Spellbinders Be Bold Blooms die set to make these die cuts the real star of this card.


For this card, I selected several colors of Concord & 9th cardstock: Sprout, Parsley, Ballet Slipper, Honeysuckle, Aqua Sky, Oceanside, White, Mushroom, and Buttercup. I love the gorgeous colors in Concord & 9th's color palette! This yardstick is also a lighter weight at 80 lb, so is easier to layer with designs like this Spellbinders die set. This set has so many elements! I ran all the dies through several times, and I still have a pile of leftovers for more cards!

the leftovers!

This was the first time using this set for me and I did find the process rather tedious at times. The small flower centers, in particular, were the most challenging. I figured out a quicker way to pop all those tiny circles out of the flower centers--I placed the die cut on a folded paper towel, then used my piercer to press down into those tiny dots. It was a bit of an ASMR experience--every time a dot was cut well enough to come out, there was a little pop and a tiny bit of cardstock would go flying, but it was quick and easy! 

I also found I needed to use the Sizzix precision base plate for these dies. All the other tricks of intricate die cuts--running them through upside down, making sure they're on the sides of the plate--just didn't work with these. Once I started using the precision base plate, my cuts were much better, which reduced my frustration considerably! The end result of this frustration and tedium, however, it worth it. These are beautiful die cuts, which made the card easy to put together.

For the card itself, I used a white card base, then used the Hand Stitching 1 embossing folder from Paper Rose to emboss a square of Ballet Slipper cardstock. Both sides of this embossing folder are beautiful--I chose to use the reverse, with the "stitches" raised up toward the recipient. I trimmed that panel down to 5" by 3.75" for landscape orientation, and built the floral arrangement. I placed the longer pieces on the top and left sides first, then popped up the largest blooms in the upper left corner. I filled in the arrangement with smaller flowers and leaves until I was happy with the design.

For a sentiment, I chose "Thinking of you" from the Vintage Garden set by Simon Says Stamp. I heat embossed it with Simon's fine detail silver embossing powder, then cut it out and popped it upon the panel.  I added some silver baubles from Trinity Stamps to add some extra sparkle among the die cuts. Finally, I added foam tape to the back of the pink panel to give it some dimension, and added it to the card base. 

Do you like assembling die cuts like this Spellbinders set? What are your favorite tips and tricks?

Thanks for reading! Have a lovely day!

Supplies used:

  • Hand Stitching 1 embossing folder -- Paper Rose (SSS)
  • Vintage Garden stamp and die set -- SSS
  • Fine detail silver embossing powder -- SSS
  • Embossing ink -- SSS
  • Connect glue -- Gina K (GKD / SSS)
  • Fine tip bottle -- Gina K (GKD)
  • Foam adhesive from my stash
  • Neenah Classic Crest 80 lb. white for card base


Tuesday, November 8, 2022

November 2, 2022: Simon Says Stamp Wednesday Challenge "Thanks/Thanksgiving"

November 2nd's Simon Says Stamp Wednesday Challenge used the theme "Thanks/Thanksgiving" and showcased Hero Arts products. I dove for my stash--because my goodness do I have a collection of Hero Arts products. They're such a wonderful company and I don't do their products justice.

For this challenge, I picked two different products out of my stash and created two fun cards with autumnal colors. I had backgrounds that I had made with the Tim Holtz Distress Mica Spray Stain and the Simon Says Stamp Fall Foliage embossing folder. These backgrounds were going to be perfect for fall thank you cards.

Happy Thanks Card

For this card, I used the Happy Thanks XL stamp and die set from Hero Arts.

First, I trimmed the embossed panel to 4"x5.25" then popped it up on a white card base. Next, I cut the thanks die three times from Simon Says Stamp black cardstock and layered them together for a stacked look. I added this to the card, then covered it with two layers of Glossy Accents to give it some extra dimension and shine and help it stand out against that lovely shimmery background. 

Next, I added a sentiment from that same set, stamped with Altenew Obsidian pigment ink and embossed with clear embossing powder. Finally, I accented with some Trinity Stamps Midnight Ball baubles.

I embossed that sentiment four times--can you see the little white points in the image? When I stamp, the ink looks crisp and solid black. I pour on the embossing powder, which also looks even, then heat set... and these little white dots appear. Is my clear embossing powder contaminated with white? If you have any ideas on what's happening there, please share your ideas.

Autumn Wreath Card

For the next card, I picked out the Autumn Wreath stamp and coordinating dies. This set has so many cute images! The snail and the mushroom are particularly adorable.

I knew I wanted to do something with purple, as I had lots of lovely purple shading on the background. I heat embossed the wreath image with Brutus Monroe Gilded embossing powder onto Gina K Plum Punch cardstock. The plum really caught the purple in the background! I used the coordinating die to cut it out, then cut it another three times to give it some nice dimension. I used a Gina K sentiment, A big thank you, stamped and embossed in the same Gilded powder on the center of the wreath.

Next, I took those adorable little leaves, and stamped them lots of times on white cardstock. I grabbed some ink cubes in Gina K ink colors plum punch, faded brick, and honey mustard, and blended randomly across the stamped images. I cut those out and arranged them in groups of three on my card. Finally, I added more shimmer to the wreath with Trinity Stamps' Gold Satin Baubles.

I love how this card turned out, with all the shades of purple and gold! Do you have a favorite of these cards? Let me know in the comments, or just say hello so I know you stopped by. Thanks for reading!

Also, if you've created and shared two cards in a single post and submitted them both to InLinkz... please tell me how! I'm stumped how to submit both these cards to the challenge without creating two separate posts, which seems excessive to me. 🤣


Sunday, November 6, 2022

First Holiday Card of 2022

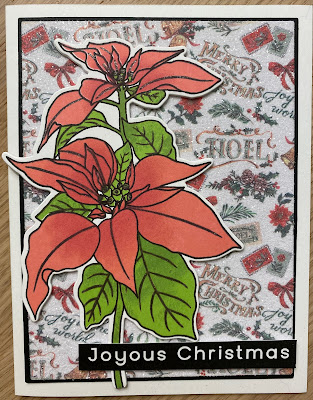
It's a late start, but it's a start! I had wanted to try this glitter technique ever since I watched Nina-Marie Trapani coat a stenciled background with Rock Candy glitter from Tim Holtz. Holy moly, I was fascinated. I had not ever thought of using an adhesive sheet to make my own glitter paper out of patterned paper from my stash.

When my Winter Foliage card kit arrived from Gina K. Designs, I knew... it was time to GLITTER. Who's ready for some sparkle?

A Christmas card with a stamped poinsettia on a glitter coated patterned paper. The sentiment reads "Joyous Christmas".

I started out by creating the lovely poinsettia. I used Pinkfresh inks for the stamping: passion fruit, candy apple, grassy knoll, and olive. I stamped the image in Gina K Black Onyx ink, then used the passion fruit and grassy knoll for the first layer. Next, I used a small blending brush to tap on candy apple and olive inks to add a little shading. I then used my Sakura stardust pen to trace over the lines in the leaves and petals of the poinsettia for a little bit of fun sparkle and die cut with the included die.

I pulled out my stash of holiday themed paper packs and found a few options with a nice match to the color and picked this Noel paper pad from Craft Consortium. The vintage style of the paper was a good partner to the stamped poinsettia.

The sheet adhesive I have is Stick It adhesive--it's been hanging out in my stash for a while. I pulled back the release paper from one strip, adhered the paper down, then gently pulled out the remaining backing strips until I could fit the entire piece on the adhesive. I burnished it well then trimmed it out with scissors.

I pulled off the other backing paper, then poured Rock Candy glitter over the. Whole. Sheet. Two notes. 1-Even working over a piece of paper, I managed to glitter bomb my craft space. 2-Three days later, even after a good cleaning, I'm still finding glitter. 😂  Another note for future me--remove the strips from the Stick It before placing the paper down. I did have some adhesive edges catch and pull away when I slid the backing strips out from under the patterned paper, so there were some areas that didn't catch much glitter. Minor detail, however; I could hide the missing glitter with the die cut, and the rest of the paper was SO glittery it was hard to notice a little bit missing.

I trimmed it down with Master Layouts 1, then added a black layering panel behind it and added it to my card base. I popped up the poinsettia and added a holiday sentiment from my stash.

I'm pretty pleased with how this turned out! It was more effort than I want to use for mass producing cards, but it's so sparkly! 


Friday, November 4, 2022

That was a hot minute there...

 Yeah. I'm not really the best at this blogging thing. I have plenty of thoughts in my head at about 2 AM, but come daylight, they're gone. 

That's probably for the best, honestly. Those thoughts aren't ever the finest, are they?

HOWEVER. I do have some ideas on what I want to do for crafting and sharing that fun here. This tiny corner of the internet may not be much, but it's mine, and I plan on actually making use of it. 

Friendship Leafy Cluster Card

 I saw the beautiful stamp, die, and stencil set Friendship Leafy Cluster from Simon Says Stamp and knew that I just HAD to get this set. Th...